Using
Webmail
This tutorial is our how-to
guide for using Webmail. It does not cover every aspect of Webmail; instead, it
focuses on some of the most popular features.
You can click any of the links
below to jump to a specific section.
· What browsers can I use to view my mail?
· Email size and storage limits
· Adding attachments to a message
· Downloading email from a POP3 account
· Working with Webmail folders
· Managing Address Book contacts
· Importing and Exporting contacts
· Using the Allowed and Blocked Senders lists
· Enabling an auto-replay message
· Changing your email password
· Changing the Webmail language
· File storage and sharing file
· Customizing your spam settings
· Clearing the cache and cookies from your web browser
What browsers can I use to view my mail?
Webmail supports the following
browsers:
·
Mozilla Firefox 2.0 and higher
·
Chrome 1.0 and higher
·
Safari 4.0 and higher
Note: You may be able
to view the Webmail interface on other, unsupported browsers; however, some
features may produce unexpected results.
Email size and storage limits
All e-mail accounts provide 2
GB of server side storage for archiving messages. You can send messages up to
25 MB in size.
The maximum size for email
messages, including any attachments, is 35 MB; however, when attachments are
sent over the Internet, they must be encoded, and this encoding increases the
size of the message. The size increase can sometimes be more than 25 percent.
We recommend that you not try
to send attachments that are larger than 25 MB. If you want to share large
files, we recommend that you use the Files feature that is part of
Webmail.
In addition, some mail servers
will not accept large email messages, so if you attach a large file to your message,
it may not reach its intended recipient.
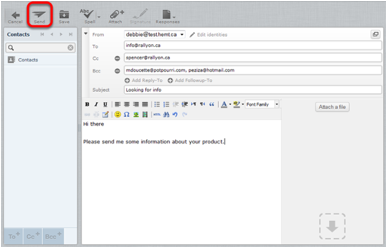
Composing a new message
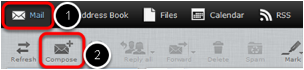
1. Click Mail, and then
click Compose.
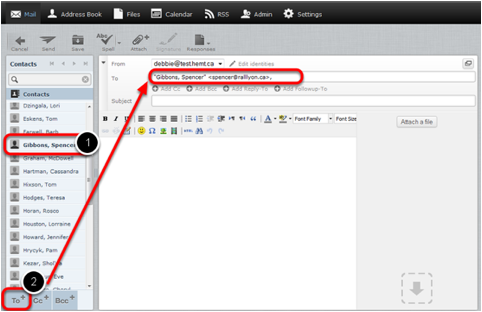
2. In the To
field, enter the email addresses to which you want to send the message
(separate multiple addresses with a comma).
Alternatively, in the Contacts pane on the left side, select one
or more addresses from your saved contacts list, and then click the To
button at the bottom of the pane.
3. You can send a copy of the
message to other addresses by entering the addresses in the Add Cc field
as described above.
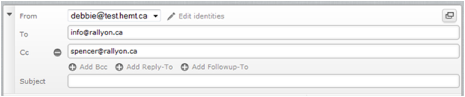
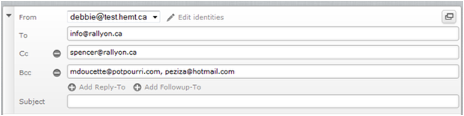
In the example below, the
message is addressed to "info@rallyon.ca". The
recipient "spencer@rallyon.ca" will
receive a copy of the message and (along with any other recipient listed
in the Cc field), will be able to see that the message was sent to
"info@rallyon.ca".
You can also send a
blind carbon copy of the message to other addresses by entering the addresses
in the Add Bcc field as described above.
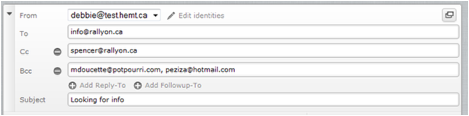
In the example below, the
message is addressed to "info@rallyon.ca". The
recipient "spencer@rallyon.ca" will
receive a copy of the message and will be able to see that it was sent to
"info@rallyon.ca". However,
none of the recipients (in the To, Cc or Bcc fields) can see that a Bcc (blind
carbon copy) was sent to "mdoucette@potpourri.com" and
"peziza@hotmail.com".
4. In the Subject
field, enter a subject for your email message.
5. In the large text
area below, type the body of your message.

6. When
you are finished writing your message, click Send to send your message.
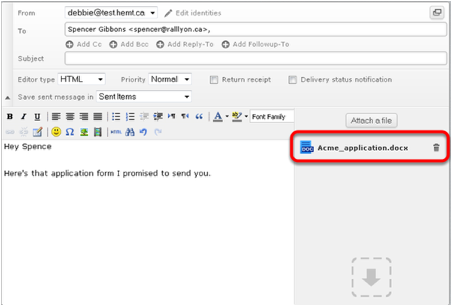
Adding attachments to a message
1. While composing an email
message in Webmail, click Attach a file. You can find this option in the
toolbar and in the message area, and you can click either one.
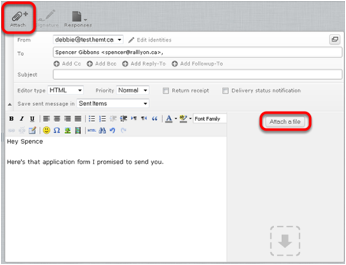
2. From the pop-up window,
select the file you want to attach to your message, and then click Open.
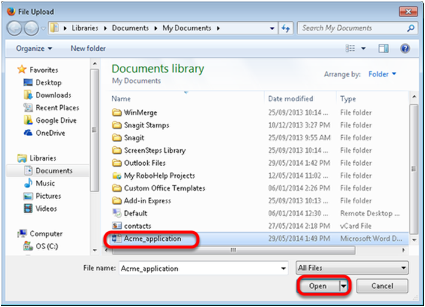
3. Click Upload.
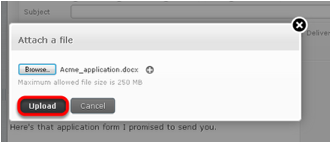
The file is now attached
to the message.
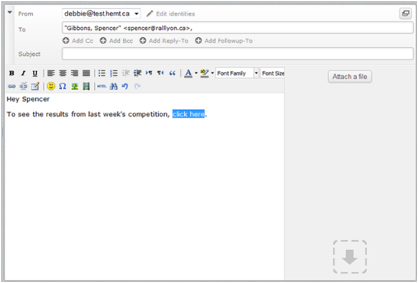
Inserting a hyperlink
You can insert hyperlinks in
your messages so that, when the recipient clicks on the link, the associated
web page opens.
To insert a hyperlink in an
email
1. In the body of your
message, enter the text that you want to make into a hyperlink.
This can be the actual location or URL (such as http://www.example.com) or any text
(such as click here).
2. Highlight the text by
holding down the left mouse button as you drag the cursor over the text.
3. Click the Insert/Edit
link icon.
![]()
The
Insert/Edit Link window appears.
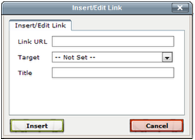
4. In the Link URL
field, enter the link destination, for example, http://www.example.com.
5. Optionally, from the
Target drop-down list, choose whether you want the link to open in the
same window or in a new window.
6. Optionally, in the Title
field, enter a description that will be displayed when the recipient moves
their cursor over the link
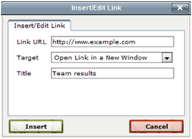
7. Click Insert.
Searching for messages
This tutorial will show you
how to search for a specific message in Webmail.
1. In the Mail folders
section, select the folder that you want to search.
2. From the Search
drop-down list in the top-right corner of the window, select the type of search
criteria you want to use.
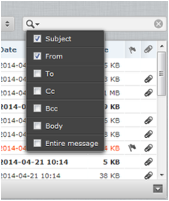
3. Type your search
criteria in the search field and then press Enter.
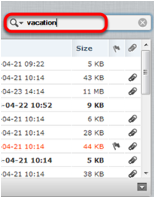
Any messages in the
selected folder that match your search criteria are displayed.
Downloading email from a POP3 account
This tutorial will show you
how to download messages from another email account into Webmail using POP3.
To set up a POP3 account in
Webmail, complete the following steps:
1. Click Settings.

2. Click Preferences,
then Other Accounts.
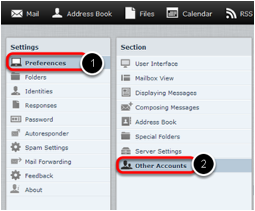
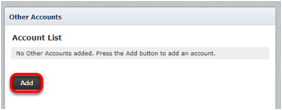
3. In the Other
Accounts pane, click Add.
4. Complete the fields
on the Add POP3 Account page as follows:
· Email—Enter the
full email address of the other account.
· Username—Enter the
username you use to log into your other email account.
· Password—Enter the
password you use to log in to the other email account.
· Provider—From the
drop-down list, choose the account's service provider.
· Server Address—The
server address can be obtained from the provider of the email account you are
trying to download.
· Server Port—Use port
110 if you do not put a check in the SSL box. Use port 993 if you do put
a check in the SSL box.
· Use SSL—Putting a
check in this box will make Webmail access your other email account through an
encrypted connection.
· Leave Messages
On Server—Put a check in this box if you want to leave
a copy of the messages you download in the original email account.
· Default Folder—Select
the folder to which you want to download the messages from your other email
account.
· Test connection
on save—Click to put a checkmark in this box if you
want to test the connection to this account when you save the configuration.
· Import old
messages—Click to put a checkmark in this box if you
want to import all existing messages from the account. If you don't select this
option, only new, unread messages will be imported.
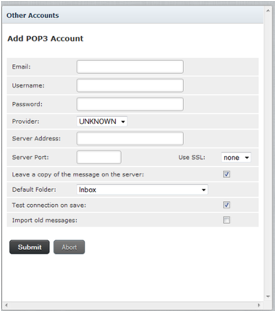
5. Click Submit.
Forwarding email
This tutorial will show you
how to automatically forward email from your Webmail address to another email
address.
Note: Email that has
been identified as spam by our system will be trapped by the Webmail Spam
filter and will not be forwarded. The reason for this is that when a piece of
spam email is forwarded by our server, the receiving server considers us to be
the source of the spam even though we weren't the original sender. If too much
spam email is forwarded by our system, it can result in our forwarding server
being blacklisted. Blacklists temporarily prevent any email from being forwarded
for all email addresses in our system. This is extremely disruptive to our
customers. By filtering email for spam before forwarding, we are able to
provide a more reliable email forwarding service.
If email from legitimate
senders is going to your Spam folder, you can add their email addresses or
domains to your Allowed Senders list. This will mark all email from those
senders as safe and all new messages from those senders will be forwarded.
For more information, see "Using
the Allowed and Blocked Senders lists".
To forward email from your
email account to another email address
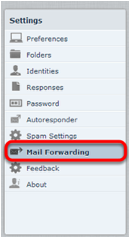
1. Click Settings.

2. In the Settings
pane, click Mail Forwarding.
3. In the Forwarding
Recipients text box, enter the addresses to which you want to forward your
messages.
Be sure to separate multiple addresses with a comma.
4. Click to put a check in the
Enabled box.
5. Optionally, to leave
a copy of forwarded messages in your Webmail account, click to put a check in
the Keep local copy box.
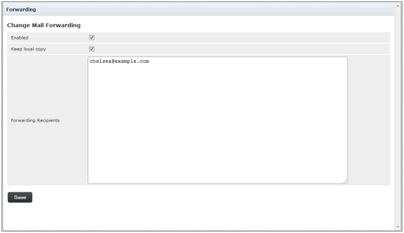
6. Click Save.
Working with Webmail folders
This tutorial will show you
how to work with your Webmail folders.
Viewing
message contents of a folder
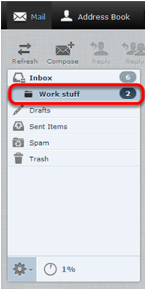
Your Webmail folders are
listed on the left hand side of the Webmail screen. Click a folder to view its
messages.
Moving messages to another
folder
To move multiple messages from
one folder to another folder
1. Click the folder that
contains messages you want to move.
2. Select the messages that
you want to move.
To select multiple
contiguous items, select the first item, hold down the Shift key, and
then click the last item. To select multiple non-contiguous items, hold down
the Ctrl key and click on each of the items that you want to select.
3. Right-click
and choose More, then Move to, and then choose the folder to
which you want to move the files.

Managing Address Book contacts
This tutorial will show you
how to manage your Address Book contacts.
Adding contacts
1. Click Address Book.
![]()
2. At the
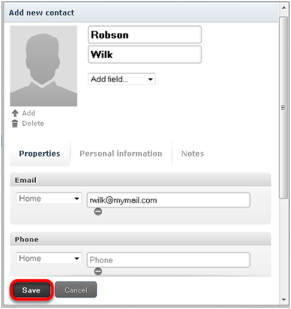
bottom of the Contacts list, click the Create new contact card icon.
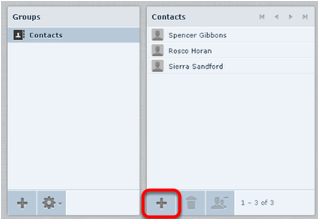
3. On the Add new
contact pane, enter the relevant contact information, then click Save.
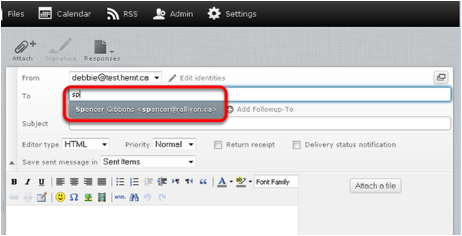
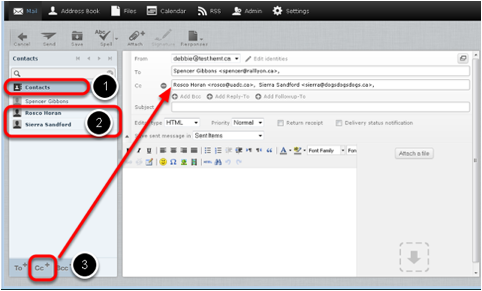
Addressing
email messages to contacts
There are several
ways to use the Address Book to address email messages.
· Click Mail
and then click Compose to start a new message. In any of the recipient
fields (To, Cc, Bcc, Reply-To, and Followup-To),
start typing the name of a contact that is in your address book.
A list of the contacts whose name includes those letters appears in a list
format. Click the name you want to add to that field.
· Click Mail
and then click Compose to start a new message. Click the Contacts
list in the left pane to display all of the contacts that are saved in your
Address Book, and then choose one or more contacts.
To select multiple contiguous contacts, select the first one, hold down the Shift
key, and then click the last one. To select multiple non-contiguous contacts,
hold down the Ctrl key and click on each one that you want to select.
Click an icon at the bottom to choose whether to put the selected contact
addresses in the To field, the Cc field, or the Bcc field.
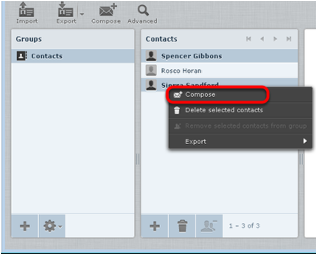
· Click Address
Book, and then from the Contacts list, select one or more of the
contacts to whom you want to send a message. Right-click, and choose Compose.
Importing and exporting contacts
This tutorial will show you
how to export your Webmail contacts into another mail program.
Exporting contacts
Contacts can be exported in
vCard format; the filename ends with.vcf.
To export contacts
1. Click Address Book.

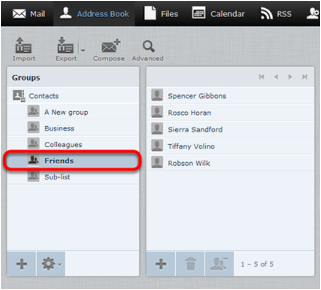
2. From the Groups
pane, choose the group that contains the contacts that you want to export.
Select Contacts if you want to export all of the contacts in the Address
Book.
3. Optionally,
click to select the individual contacts that you want to export.
To select multiple contiguous
items, select the first item, hold down the Shift key, and then click
the last item. To select multiple non-contiguous items, hold down the Ctrl
key and click on each of the items that you want to select.
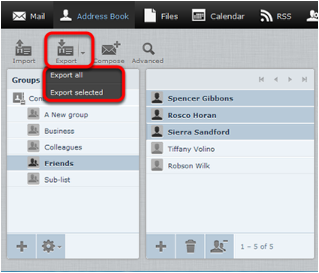
4. From the Export
drop-down list, choose Export all or Export selected.
5. Choose where to save
the exported file if prompted; otherwise, check the Downloads folder on
your computer for a file called contacts.vcf.
Importing contacts
You can import contacts from
either vCard (.vcf) files or CSV files.
To import contacts
1. Click Address Book.

2. Optionally,
select the group into which you want to import the contacts.
If you don't select a group, the contacts will be imported into the Contacts
group only.
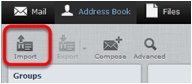
3. Click the Import
icon.
4. Click Browse
and navigate to the contacts file that you want to import. Select the file, and
then click Open.

5. Select which address book
the contacts should be imported to. The checkbox lets you delete all contacts
from the selected address book before importing. Be careful with this, the
deletion cannot be undone!
6. Click Import.
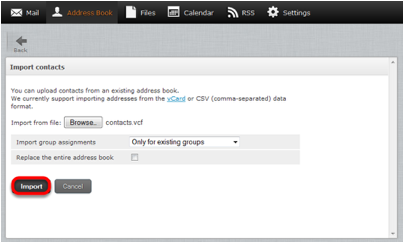
Webmail imports the contents
of the file and assigns the contacts to the master Contacts group and,
optionally, to the groups if selected.
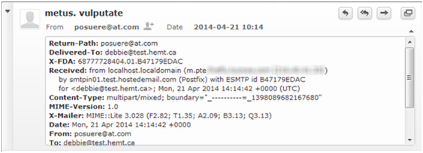
Viewing email headers
This tutorial will show you
how to obtain the full headers from your email messages in Webmail. Viewing
headers is useful for email troubleshooting, including email delays, spam,
viruses, and abuse issues.
1. Display the message and
then click Toggle Raw Message Headers.
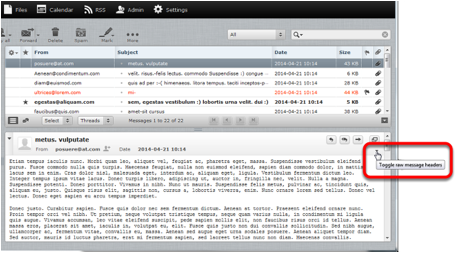
A window appears that
contains the Internet headers as well as the content of the email message. If
the email was sent as HTML you will also see the HTML source of the message.
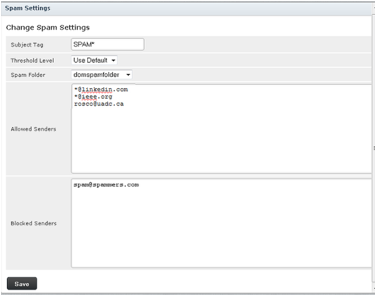
Using the Allowed and Blocked Senders lists
Webmail provides a tool that
allows you to block or allow email from specific senders. You can add up to
1000 entries in the Blocked Senders list and 1000 entries in the Allowed
Senders list.
Make sure that you enter the
sender's email address or domain as it appears in the sender's
"Return-Path." The return path is in the first line of the email
headers. This may not be the same as the address that is displayed in the From
field of the message.
For information on how to view email headers, click
here: "Viewing email headers"
Note: If you see the
following error message when trying to add an address to your Blocked or
Allowed list, you have reached the maximum address limit.
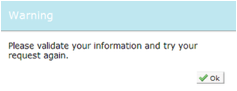
If this happens, you
should consider revising your Allowed Senders and Blocked Senders lists to fit
below the limit. Replacing multiple addresses that are in the same domain with
a wildcard (*) is one way to trim down these lists.
If you want to add a domain to
the Allowed or Blocked Senders list, the domain name must be preceded by *@
(for example, *@example.com).
Important: Be careful when
adding entire domains to your list. If you add something like *@hotmail.com
to your Blocked Senders list, you are blocking every sender with a hotmail
address.
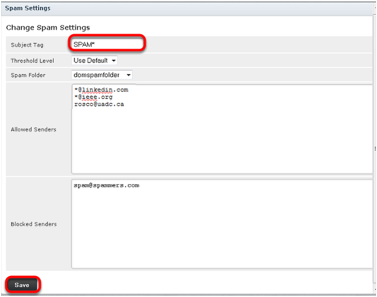
Adding
senders to the Allowed or Blocked lists
To add senders to the Allowed
or Blocked Senders lists.
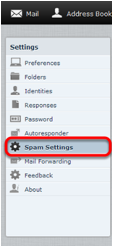
1. Click Settings.

2. In the Settings
pane, click Spam Settings.
3. In the Allowed
Senders or Blocked Senders text box, enter the email addresses that
you want to allow or block, and then click Save.
Creating an email signature
An email signature
automatically inserts a standard footer at the bottom of all outgoing email
messages.
This tutorial will show you
how to create and enable an email signature.
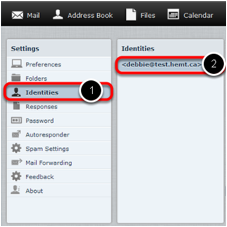
1. Click Settings.

2. In the Settings
pane, click Identities, and then click the account for which you to
create a signature.
3. Enter your email signature
in the Signature text box.
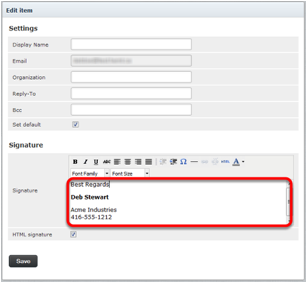
4. If you primarily send
formatted (HTML) messages, you can enable the HTML signature option
which allows you to add formatting of your signature; when HTML signature
is selected, the Signature text box displays a formatting toolbar.
5. Click Save.
6. In the Settings
pane, click Preferences and then click Composing Messages.
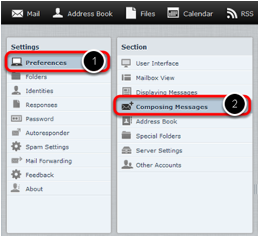
7. In the Signature
Options section, from the Automatically add signature drop-down
list, choose the option to specify the way you want to display your signature:
· never—Do not
display the signature.
· always—Display
the signature on all messages, including new messages, replies, and forwards.
· new message only—Display
the signature on new messages, but no on replies or forwards.
· replies and
forwards only— Display the signature on replies and
forwards but not on new messages.
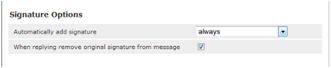
8. Click Save.
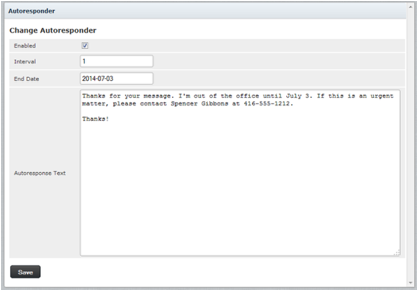
Enabling an auto-reply message
Auto-reply messages are a
great way to let people know that you are away for an extended period of time.
This tutorial will show you
how to compose and enable an auto-reply message.
1. Click Settings.

2. In the Settings
pane, click Autoresponder.
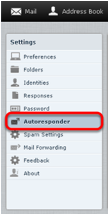
3. Complete the fields in the Autoresponder
pane as follows:
· Click to put a
checkmark in the box next to Enabled.
· In the Interval
field, enter the number of days before the same recipient will receive the
auto-response message again. If not specified, the interval defaults to one
day.
· Click in the End
Date field, and select the date when you want to stop the autoresponse
message from being sent.
· In the Autoresponse
Text field, type the message you want to be automatically sent in reply to
all incoming email messages.
4. Click Save.
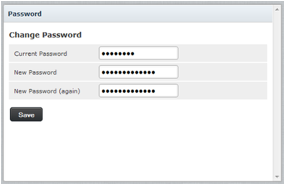
Changing your email password
This tutorial will show you
how to change your email password while logged in to Webmail.
1. Login to your mail account
and visit https://registration.lycos.com/memberedit.php.
2. Click the box next to Change Password.
3. Follow the
instructions to change your password.
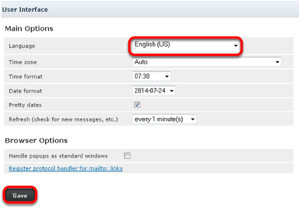
Changing the Webmail language
This tutorial
will show you how to change the language of your Webmail account page.
1. Click Settings.

2. In the Settings
pane, click Preferences, and then click User Interface.
3. From the Language
drop-down list, choose your language, and then click Save..
Setting the time zone
This tutorial will show you
how to change the time zone in your Webmail account. It is important to keep
this up-to-date if you are traveling, otherwise the time stamps on your emails
will be incorrect.
1. Click Settings.

2. In the Settings
pane, click Preferences, and then click User Interface.
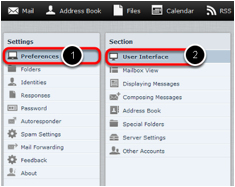
3. Next to Time zone,
choose your time zone from the drop-down list, and then click Save.
File storage and sharing files
File sharing allows you to
share files outside of email. The largest file attachment you can send in your
email is 25 MB. Using file sharing you can share or store a back-up copy of
files larger than 25 MB. This tutorial provides an overview of the file storage
feature.
Important: Files uploaded
to Webmail count against your mail storage quota. If your email account has a 2
GB quota and you upload a 1 GB file, that leaves 1 GB of free storage quota for
your email messages.
To access your file storage,
click Files in the Webmail header.
Uploading files
You can save up to 2000 files
in the Files section, with up to 1000 files in any one folder.
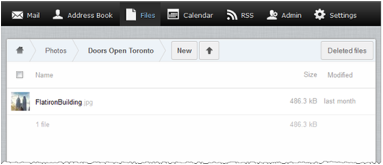
Once a file is uploaded, you
can share it with others by sending them a link to the file.
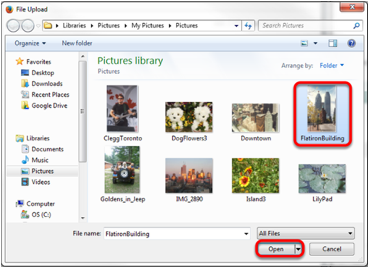
To upload a file
1. Click Files.

2. Optionally,
select the folder where you want to store the file. If you don`t select a
folder, the file will be stored at the top level, also known as the root.
3. Click the upload
icon.
![]()
4. Browse to the file that you
want to upload, select it, and then click Open.

The selected file is
uploaded to the folder that you chose in step 2.
Note: Large files may
take a few minutes to upload.

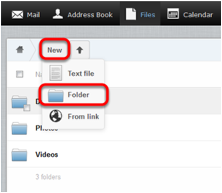
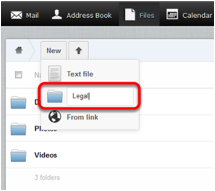
Creating folders
You can create
customized folders to organize your files.
To create your own folders
1. In the Files
section, click New, and then click Folder.

2. In the text box, type
a name for the new folder and press the Enter key.
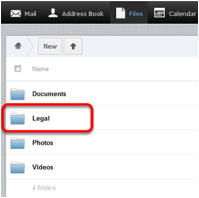
Your new folder is
displayed in your Files list.
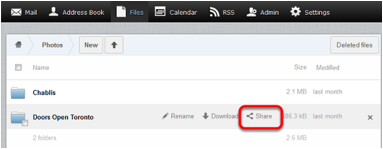
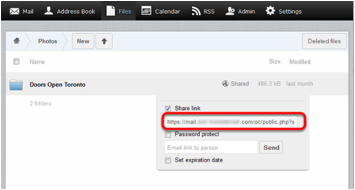
Sharing files
To share files and folders
1. Mouse over the file or
folder that you want to share, and click Share.
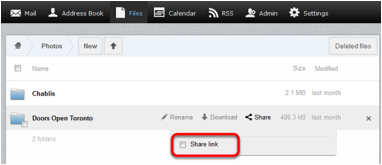
2. Click to put a check
in the Share link box.
The box expands to
display a link for the file or folder.
Highlight and copy this link.
You can now use the link to
share the file or folder over email, instant messenger, social networking, and
so on.
If you want to email the link
to a single address without having to copy it and then paste it into an email
message, you can enter an email address in the Email link to person text
file and click Send.
If you put a check in the Password
protect box and enter a password in the corresponding field, anyone who
tries to use the link will have to enter the password you specified before they
can view the file or folder.
You can also put a check in
the Set expiration date and choose the date when the link will stop
working. When you click anywhere in the field, a calendar appears that allows
you to choose the expiry date.
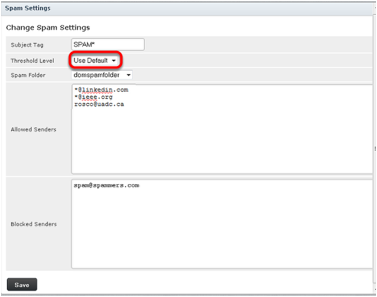
Customizing
your spam settings
Adding a custom spam tag
By default, when a message
arrives in your mailbox that Webmail identifies as spam, that message has a
flag added to it, to indicate that it's spam. The spam flag isn't visible to
you, but if you add your own custom tag, then all incoming spam messages will
have your custom spam tag added to their subject line.
To customize your Webmail's
spam tag
1. Click Settings.
2. In the Settings
pane, click Spam Settings.
3. In the Subject Tag
field, enter the custom spam tag that you want to use, and then click Save.
We recommend that you add a space or special character at the end of your tag
so it does not run into the first word of the original subject line.

Any messages you download that
are suspected of being spam will now have your custom spam tag in their Subject
line and should be easy to identify.
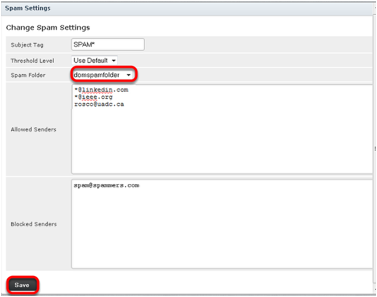
Choosing a spam folder
By default, incoming spam
messages are sent to your Spam folder. However, you can change the destination
folder of incoming spam.
To change your destination
spam folder.
1. Click Settings, and
then click Spam Settings.
2. From the drop-down menu
next to Spam Folder, select the folder where you want incoming spam
messages to be delivered, and then click Save.

Choosing the spam block level
If you are receiving too much
spam in your Inbox, or too many false positives in your Spam folder, adjusting
the spam blocking level may help. The spam blocking level determines how likely
a message is to be marked as spam. A higher blocking level means messages are
more likely to be marked as spam; however, you may also find that a lot of
innocent messages are also classified as spam ( false positives).
1. Click Settings, and
then click Spam Settings.
2. Choose the spam blocking
level from the drop-down menu next to Threshold Level, and then click Save.
If you choose a level
other than Normal, the spam filter will be more aggressive in
classifying messages as spam.
If you choose Use Default,
your mail will be filtered for spam using the level that is set for your
domain.
If you choose High or Very
high, more messages will be classified as spam; however, you may also find
that a lot of innocent messages are also classified as spam. These messages are
referred to as False Positives.
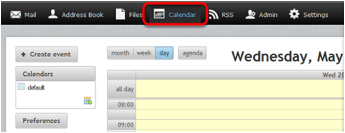
Using the calendar
The web-based calendar feature
allows you to manage your schedule online in Webmail. This tutorial provides an
introduction to the calendar's features.
To get started, click Calender.
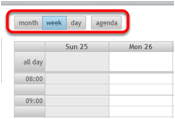
You can click Day,
Week, Month or Agenda to view or add upcoming events.
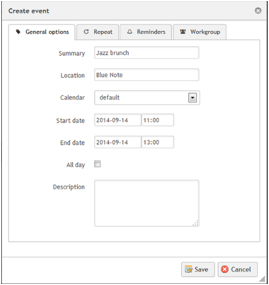
To add events to the
calendar, double click a time slot. You can then set details such as the
name of the event, the location, and the duration.
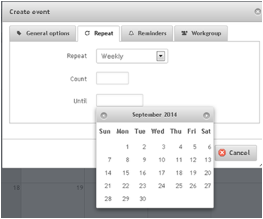
Click the Repeat
tab to create a recurring event such as a weekly meeting.
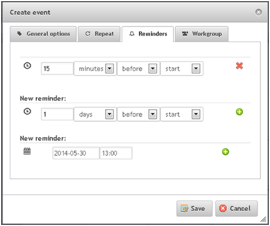
You can also set
reminders to appear when the event is coming up. You can have reminders that
are set at a specific number of minutes, hours or days before (or even after)
the start or the end of the event, and you can set a reminder for a specific
date and time.
Clearing
the cache and cookies from your web browser
Your web browser stores
temporary Internet files, which allow frequently visited websites to load
faster, but these files may need to be deleted occasionally to free up space
and remove old or corrupted files. If you are having trouble loading Webmail,
it may help to remove your browser's temporary files. Click one of the links
below to go to the instructions for the browser that you use:
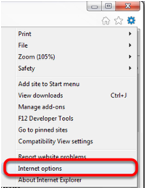
Internet Explorer
1. Click the gear icon at the
top of the browser, and choose Internet options.
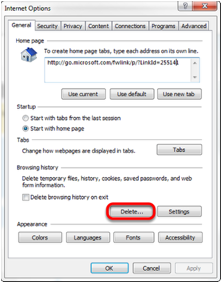
2. In the Browsing
history section, click Delete.
3. Click to put
checkmarks next to Temporary Internet files and Cookies, and then
click Delete.
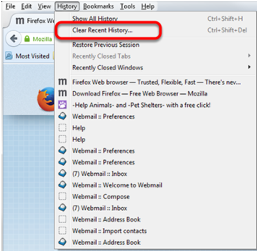
Mozilla Firefox
1. From the History menu,
choose Clear Recent History.
2. From the Time
range to clear list, select Everything. Click to put checkmarks next
to Cookies and Cache, and then click Clear Now.
Google Chrome
1. Click the Chrome menu at the
top of the page, choose Tools, and then choose Clear browsing data.

3. From the Obliterate the
following items from drop-down list, choose the beginning of time,
click to put checkmarks next to Cached images and files and Cookies
and other site and plug-in data, and then click Clear browsing data.